iPhone 11 Pro Review: China

Shot on iPhone 11 Pro w/ Ultra Wide lens.
nĭ hăo (hello from China!)
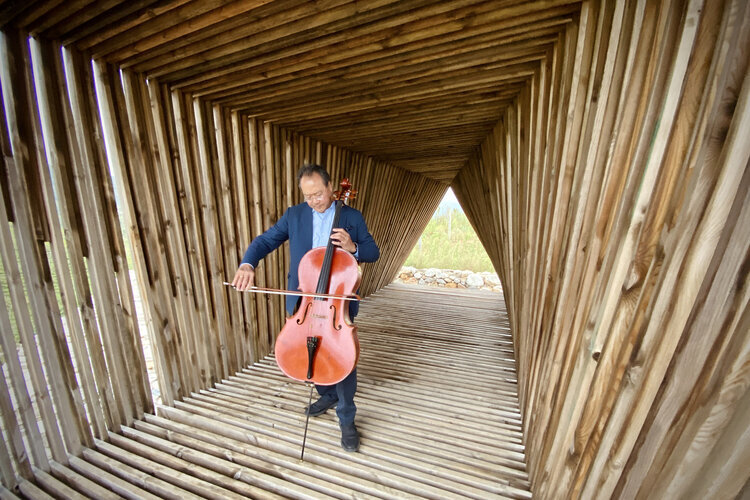
I’m here as I continue on-going work photographing The Bach Project w/ Yo-Yo Ma, a world tour where Yo-Yo is performing Bach in unconventional places around the globe. It’s been a privilege to photograph this amazing journey, and when I considered how to test the iPhone 11 Pro’s new capabilities, I thought a shoot on this project could be a great fit as many of these shoots have been in extremely low light!
Of course, I’ve also been anxious to see what this Ultra Wide lens can do, so shortly after the performance I popped out to the countryside to find some epic landscapes and have been out exploring this big, beautiful country ever since.
The iPhone 11 Pro announcement was really about one thing: camera. (ICYMI, see this video pretty much summing it up.)
The big camera features I was most interested in testing were obviously the Ultra Wide (13 mm) lens, the new Night mode, Capture Outside the Frame, and things like iOS 13 photo management, editing tools, etc.
My driving question remains:
How will this new tech make
our pictures and videos better?
It’s been a blast to shoot with and test this strong camera upgrade and I’m excited to share the results.
I hope you enjoy!

Three Lenses in Our Pocket
The addition of any new lens is a pretty big deal. You might remember my excitement when we gained the “telephoto” 51mm lens with the iPhone 7 Plus, and today I’m just as thrilled to be putting an entirely new Ultra Wide lens in my pocket. It gives us another format to tell the story, another perspective to visualize, and a better rounded tool for doing our best creative work.
Any new lens would be great, but I especially love shooting super wide angle — my main lens on my dSLR has always been the Canon 16–35 f/2.8 or Hasselblad’s 21 mm (16 mm equivalent), and anyone who knows my work knows these super wide angle shots are often the ones I’m most proud of. I often reach for a super wide lens because it naturally captures a strong sense of place, and more layers to a story.
I’ve had a blast shooting with the new Ultra Wide on iPhone 11 Pro in all kinds of scenarios here in China.
Here are a few Ultra Wide favs:
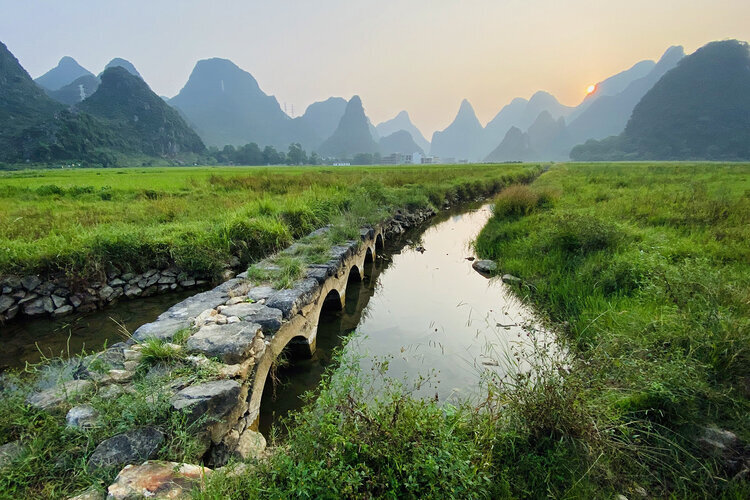

And don’t forget how great a wide lens can be shooting vertically! Here’s an image shot Ultra Wide landing in China:

Halide’s Technical Readout
As we can see in Halide’s Technical Readout tool, the strongest lens is the Wide: It has a shutter range from 1/125,000 to 1 second, and the fastest aperture at f/1.8 and fastest ISO. On top of that, it has Night mode and a stronger auto-focus system.
I’ve highlighted a few of the data points worth noting:

Left: Ultra Wide Specs || Center: Wide Specs || Right: Telephoto Specs
The Ultra Wide works really great in normal lighting conditions and overall I’m thrilled to have it, but you will feel a difference when you move indoors or shoot into the evening. The images are softer than the Wide, and without Night mode you’ll be tempted (or forced) to switch back to Wide depending on how limited your light is.
Note: I realize some of this may feel too technical, but it matters. We MUST understand our tools in order to successfully move through the creative process. If we don’t know about our cameras’ strengths and weaknesses and why they’re there, it’s really hard to solve problems and achieve our vision.
Halide builds the best third-party camera app and it includes this handy Technical Readout tool. You can download the latest version of Halide Camera with Technical Readout here.
More Perspectives, Deeper Stories
As photographers, we often think about creating a balance of “wide, medium, and tight” images in a series. Shooting the same subject with all three perspectives can take the viewer on a journey through the macro and micro — and ultimately connect viewer to subject in a deeper way.
Whether you regularly wish you had a super wide angle or not, I’d encourage you to play with capturing a subject with all three lenses. It’s a great exercise to push your creative juices and it’s a whole lot of fun to do simply with the iPhone 11 Pro and no accessories.
Seeing in the Dark
As long as I can remember, the top question I’ve received from iPhone photographers, beginners and pros alike, is How can I shoot better pictures in low light? This year’s addition of Night mode is the answer to the question. It’s easy to use, crazy powerful, and because it’s automatic it will completely change how everyone shoots on their iPhone.
After the Bach Project in Xi’an, I went down to Guilin to photograph the amazing landscapes and rivers. I met up with Huang Gaohui on the river and spent some time photographing him on his boat at sunset/dusk. It was an incredibly beautiful scene and the perfect place to test some of the new capabilities of iPhone 11 Pro, especially Night mode.
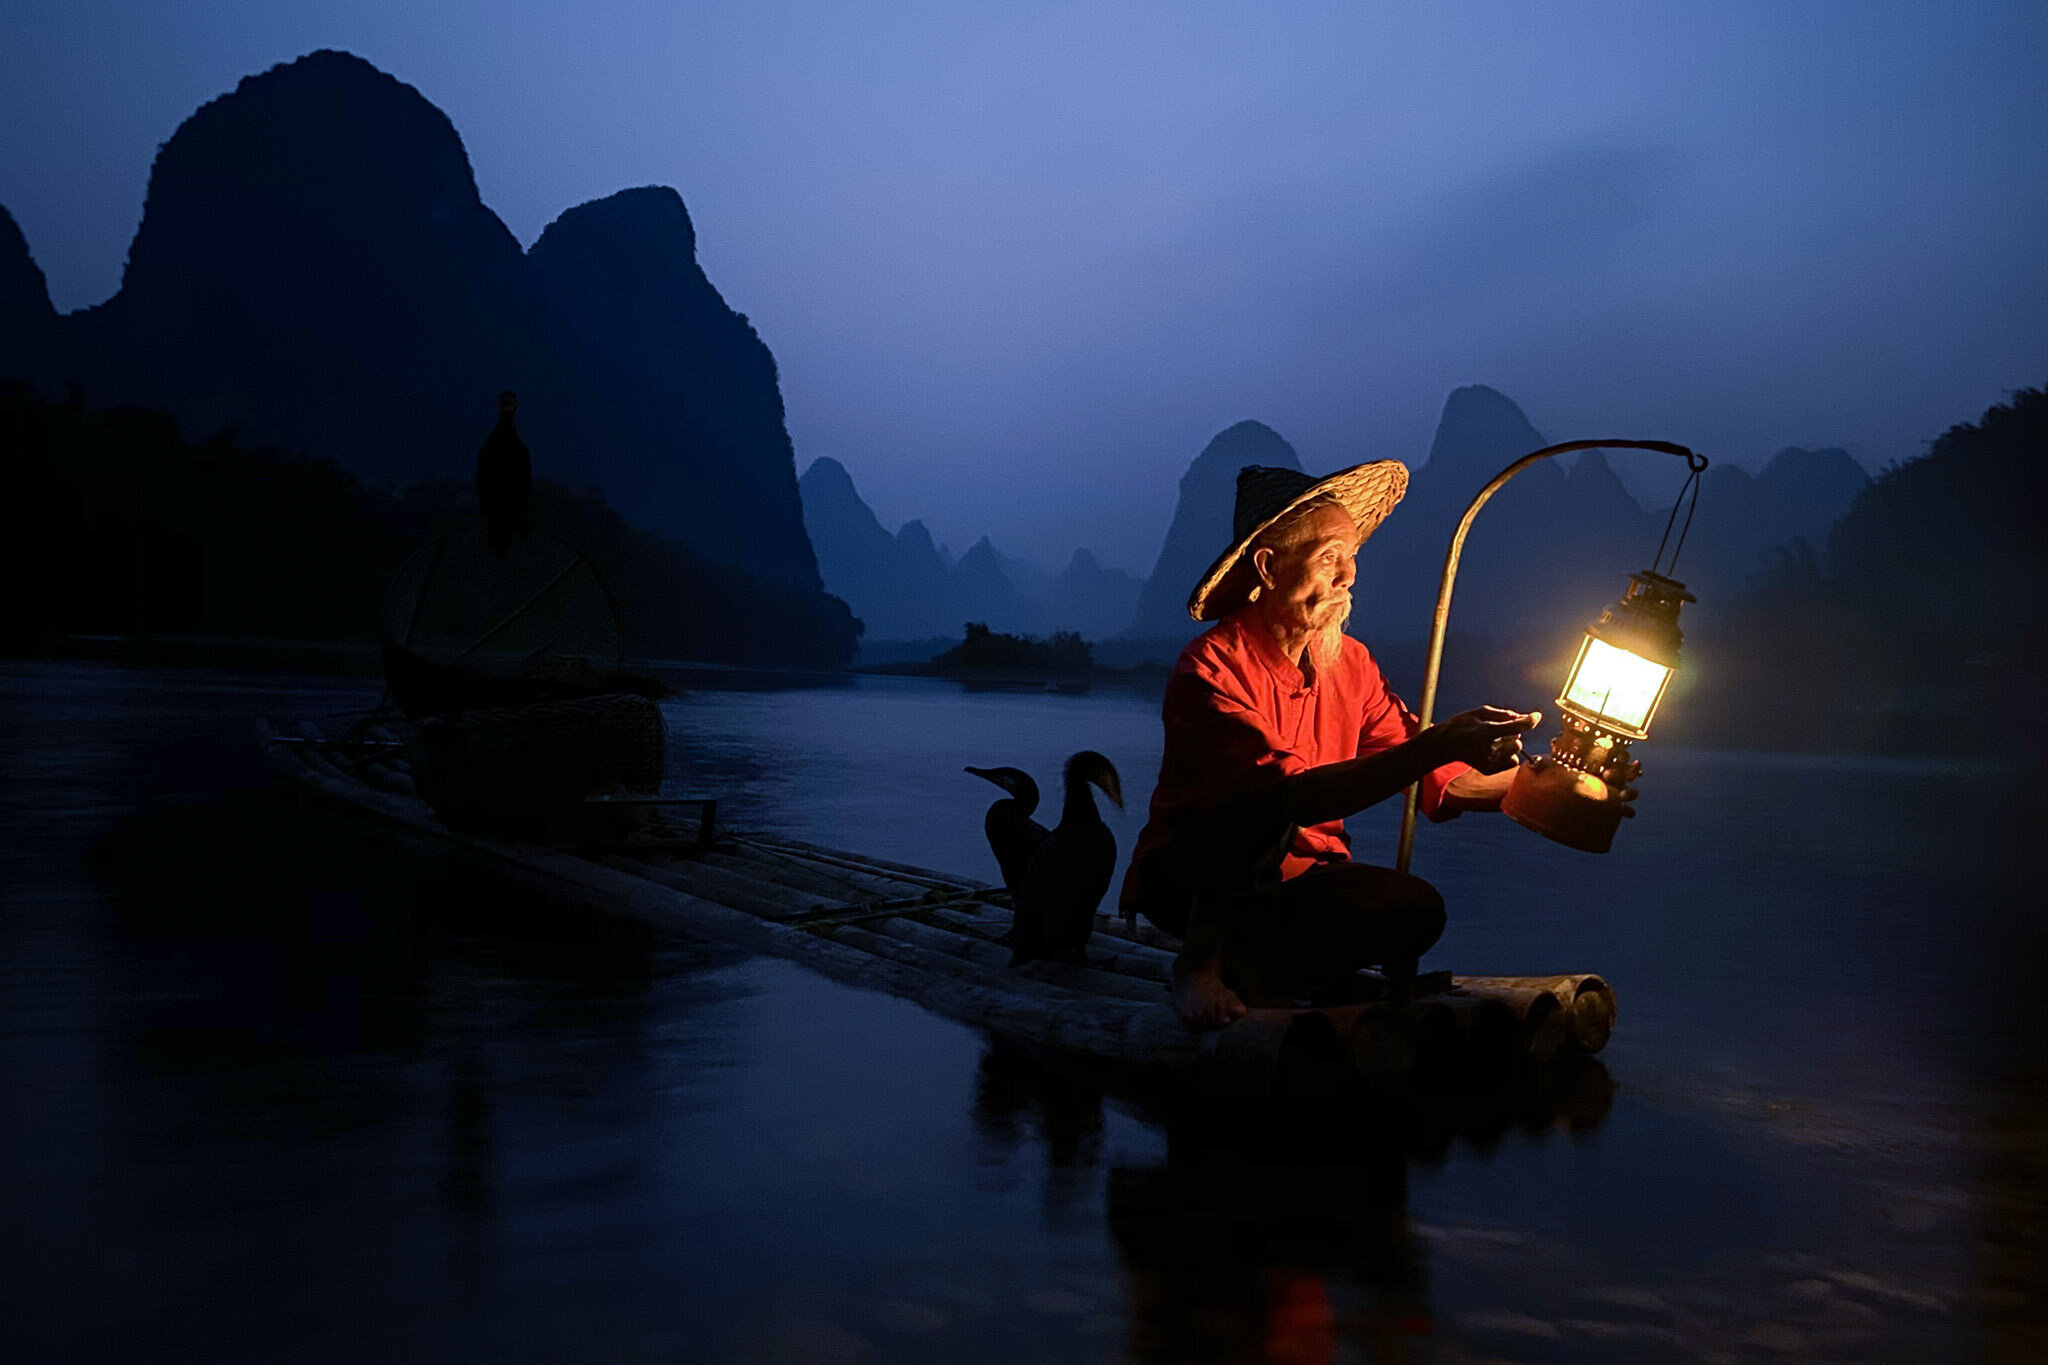
Shot on iPhone 11 Pro in Night mode (Wide lens). Guilin, China.
One thing I love about Apple’s approach to Night mode is the strategic balance of solving a technical problem while also caring deeply about artistic expression. When you look at the image above, it’s clear their team didn’t take the let’s-make-night-look-like-day approach, as some of their competitors have. Instead, it feels more like an embrace of what it actually is (night) while asking, “How do we capture the feel of this scene in a beautiful way?”
I also shot few side-by-sides (XS vs 11 Pro) throughout my journey and they are pretty dramatic:

iPhone XS vs iPhone 11 Pro w/ Night mode, handheld. Xi’an, China.
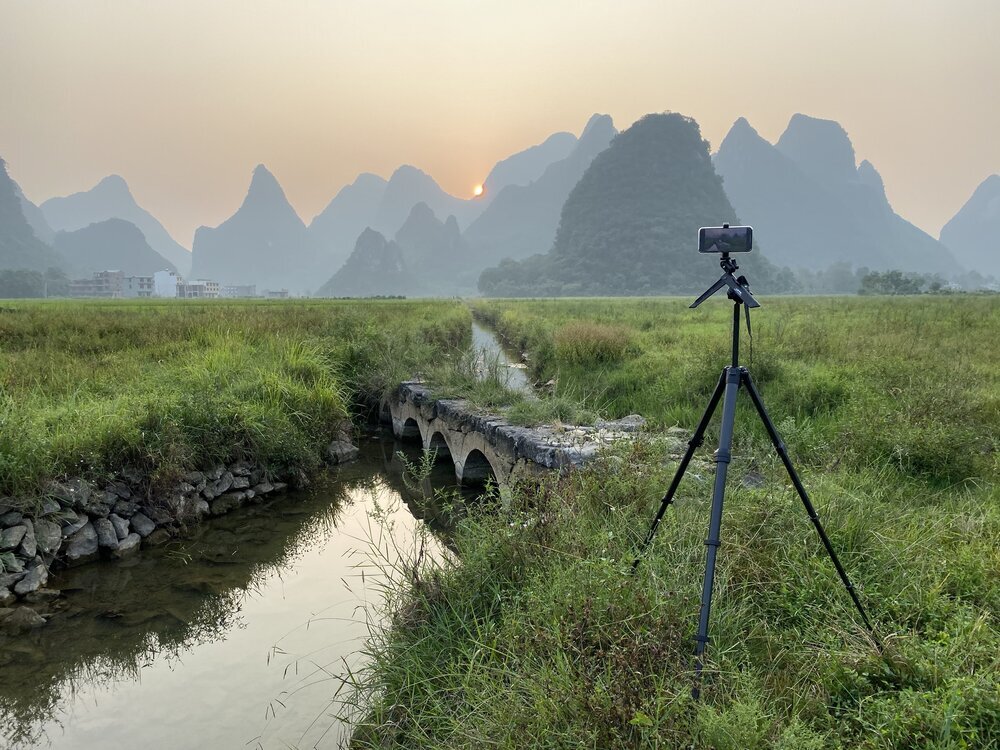
I pulled out my new Peak Design Travel Tripod and the comparisons here are not even fair:

iPhone XS vs iPhone 11 Pro w/ Night mode, tripod mounted. Guilin, China.
Many of us iPhone photographers have watched as other phones like the Pixel and the Huawei P30 have passed us in low light. It feels so good to see the iPhone 11 Pro has caught up in low light performance.
In the audience image above, notice the preservation of skin tone warmth and color, even in the super dim blue light being cast from the stage. I was really impressed by Night mode’s overall preservation of color — in some scenarios, the iPhone 11 Pro pulled out colors in low light scenes I couldn’t even see with my naked eye.
I think I can say this is easily the most dramatic leap forward we’ve seen since the introduction of panorama mode on the iPhone 5 in 2012. It’s the first time in a long time I’ve looked at an image and said to myself “wow, I can’t believe I shot this with my phone.”
How Night Mode Works
on iPhone 11 Pro
(skip if you don’t care about how geeky things work)
I’ve been caught off guard by the ability to handhold multi-second Night mode shots and maintain sharpness even while in a moving car on a bumpy road or shooting Huang Gaohui on a rocking boat.
If you are a pro familiar with shooting long exposures, you'll immediately realize something is fundamentally different about how the iPhone 11 Pro collects light in Night mode.
From what I understand, the way Night mode actually works is the camera captures a bunch of short exposures and slightly longer exposures, checks them for sharpness, throws out the bad ones and blends the good ones. On a traditional dSLR/mirrorless camera, a 5 second exposure is one single, continuous recording of the light throughout the duration of the shutter so any movement (of subject or camera) is recorded.
But with iPhone 11 Pro the rules are different… it’s not capturing one single continuous frame but blending a whole bunch of shots with variable lengths (some shorter exposures to freeze motion and longer shots to expose the shadows.) This means the subject can actually move during your exposure but still remain sharp.
I’m sure some of you are wondering, “well this is cool for handholding but what if you want to do light trails?” The iPhone actually detects when it is on a tripod and changes exposure method so that light trails and movement can still be captured.
This new way of thinking took me a good bit of testing/questioning to really figure out what is going on and it is yet another place where the computational side of photography really shines, leveraging powerful software — instead of a big lens with big glass — to capture more light.
Preservation of Skin Tones
When I first heard about improvements in how the iPhone 11 Pro renders skin tones I was excited. We’ve all seen how Smart HDR occasionally renders skin tones with that weird flat/posterized/orange look, so I was anxious to see if this problem is solved.
Where I’ve seen Smart HDR look the weirdest is underexposed shots, so I tried it on the plane over with a selfie. I shot the following images with the front-facing TrueDepth camera and adjusted the exposure down as far as it would let me.

Testing iPhone 11 Pro’s capability to preserve skin tones w/ underexposure.
Apple calls this new approach “semantic rendering” in which their software isolates skin, eyes, and teeth in order to properly preserve the texture and contrast of these features in a photograph. Judging by the images above, I’d say it works pretty well.

Left: iPhone 11 Pro Portrait mode | Right: iPhone 11 Pro Portrait mode w/ High-Key Light Mono (new this year)
I thought this portrait of Shi turned out lovely. The light was getting harsh and the conditions were far from ideal for a portrait, but the accuracy of the color balance, skin tones, and edge preservation in this shot really impressed me.
Capture Outside the Frame
One of the most interesting camera features introduced this year is “Capture Outside the Frame.” Basically, if I’m shooting with the Wide (26 mm), the iPhone 11 Pro is also capturing with the Ultra Wide (13 mm) so I can decide later about my framing. If the software detects a human on the edge of your frame, a little icon pops up to indicate you might want to crop out which is pretty cool. As part of this feature, I can see what’s just outside of my frame (a preview of what would be included in my shot if I switched to the Ultra Wide 13 mm).

While I really like the idea of capturing the area outside the frame so I can improve composition/geometry later, I didn’t love the live preview of what’s outside my frame. When working on a tripod and meticulously composing an image, I sometimes had trouble looking at the frame for the visual balance of what was actually IN the frame, instead of being distracted by what is just outside of the frame. In the image above, notice what used to be solid black is now translucent and shows through.
For most cases, I think it’s a great feature because it invites the user into possibilities, but I’d really love the option to turn off the in-camera preview when I want to.
—
On a related note, playing with this feature in post is fun… being able to extend the crop outward to include more is really cool and it has me wondering if it would be possible to apply this same approach with exposure… for instance, could the iPhone camera potentially auto-bracket 3 stops under and 3 stops over and then give me this data later, dramatically extending the latitude for lighting adjustments in post?
A Few Wishes
Does it deserve to be called pro? I think so. To me, pro means it’s a piece of gear that meets the needs of the demanding creative professional. Pro means it’ll hold up to the elements, it won’t fail under pressure, and it will give you precise control.
While the iPhone 11 Pro is certainly more pro than previous iPhones, I have a few wishes to make it even more so.
More Visibility
In order to troubleshoot, I need to understand how my tool works. What is going on here? How is it doing what it is doing? Why is it not doing what I want it to? This is why I find Halide helpful.
Places where I’d love more visibility are things like seeing exposure time of Night mode shots in metadata. Right now, I just see “1s” for even 30-second exposures. I’d also love better visibility around what format/FPS I’m shooting in-app so I don’t have to go out to Settings to check that. And I’d love to be able to see better real time data around the camera settings while I’m shooting so I can know what to change.
More Control
As a pro, I need even more control. This means the ability to turn off features when I want to, like OIS or the “capture outside the frame” preview feature. I’d love to choose which of my volume buttons is burst mode/video capture, and I wish I could manually control my shutter times in Night mode (it’s set automatically based on available light and stability).
With more visibility, I can look at the data and identify why I like or dislike an image, and with more control I can pull the levers to change the image and push forward to my creative vision.

Shot on iPhone 11 Pro in Pano mode, edited in iOS 13 Photos app.
Buying Advice for Photographers
In short, if you are a serious photographer, get a Pro. Think of the extra cost as buying an extra lens — it’s worth it.
If you’re considering an iPhone 11, it has a great camera and is a big upgrade from any previous iPhone, even last year’s XS in some aspects. The most significant missing camera feature on the iPhone 11 is the lack of the telephoto lens, so if you really love/want the telephoto, you’ll need to upgrade to the iPhone 11 Pro.
For those debating between iPhone 11 Pro and iPhone 11 Pro Max:
The 11 Pro and 11 Pro Max are identical in terms of camera performance (same lenses, sensors, and so on). While the iPhone 11 Pro is more nimble and lighter, the iPhone 11 Pro Max has a larger screen (viewfinder/display for editing/sharing) and has even more battery life.
For me, I’ve been using iPhone XS and plan to use iPhone 11 Pro because I like the more discreet size and the ability to shoot quickly and easily one-handed. The Max is awesome but remains a bit unwieldy for me as a one-handed camera.
No matter what iPhone you are using now, if you are serious about shooting photos with your iPhone, this is a year to upgrade. Apple had some serious catching up to do and as a result, this year has brought a tremendous leap in camera capability. Night mode and the Ultra Wide lens will change how we tell stories and express ourselves as artists using our iPhones. Now is a really good time to jump in.
As for color? I’m always a fan of the darkest color available because it minimizes reflections shooting through windows and is the most discreet in dark environments (like a concert hall), but I have to say, the Midnight Green is really beautiful. Not sure yet, but I might choose to carry Midnight Green — which is saying a lot considering everything else I own is black.


The Bottom Line
While many camera/smartphone manufactures continue to approach digital photography as a technical problem to solve, I see the team at Apple has graduated beyond technical problems and is asking deeper questions like “How can we give artists (everyone) the creative tools to express their vision?”
A perfect example of this is the approach to Night mode, where instead of just trying to maximize available light and make it as bright as possible, the Apple team asked, “How do we maintain the feel of a night scene while keeping it sharp and color accurate?”
It’s clear their camera team has been exceedingly thoughtful in their balance of technology and art — it really shows in the final images. It’s also made this year of iPhone testing more fun than usual, and I know you’ll have a blast as you begin experimenting with these new tools and possibilities.
Ask Me Anything on Instagram Stories
I’ll be doing an AMA on Instagram Stories shortly and will be happy to answer any questions you might have about iPhone 11 Pro, travel, or anything else. Join me there for more insight or to ask a question of your own.
Special Thanks


Thanks to Yo-Yo Ma and team for having me on the Bach Project and to Halide Camera & Peak Design for supporting this review..
And special thanks to Mercier Zeng, talented photographer and Chinese guide.
Essential Tools & Apps
Halide Camera
Hands down the best third-party camera app for iPhone. Simple interface, yet powerful features. Still my go-to app when I need fine-tuned manual camera control.
Studio Neat Glif iPhone Tripod Mount
I love the quick-release and vertical mount options.
(Use coupon code “austin” to get 10% off a Glif.)
UltraPod II Mini-Tripod
Lightweight yet durable plastic, and the velcro strap is very useful.
DJI Osmo Mobile 3
My new favorite of all iPhone camera stabilizers and only $129.
PeakDesign Travel Tripod
This was my first shoot working with PD’s new Travel Tripod and I really love how compact it is.
PeakDesign Travel Backpack
I’ve taken this bag to 20+ countries in the last year and love it.
have a question/comment?
More questions about the iPhone 11 Pro? I’d love to hear your thoughts and I’ll be replying to every comment below.